Tuesday, 20 August 2013

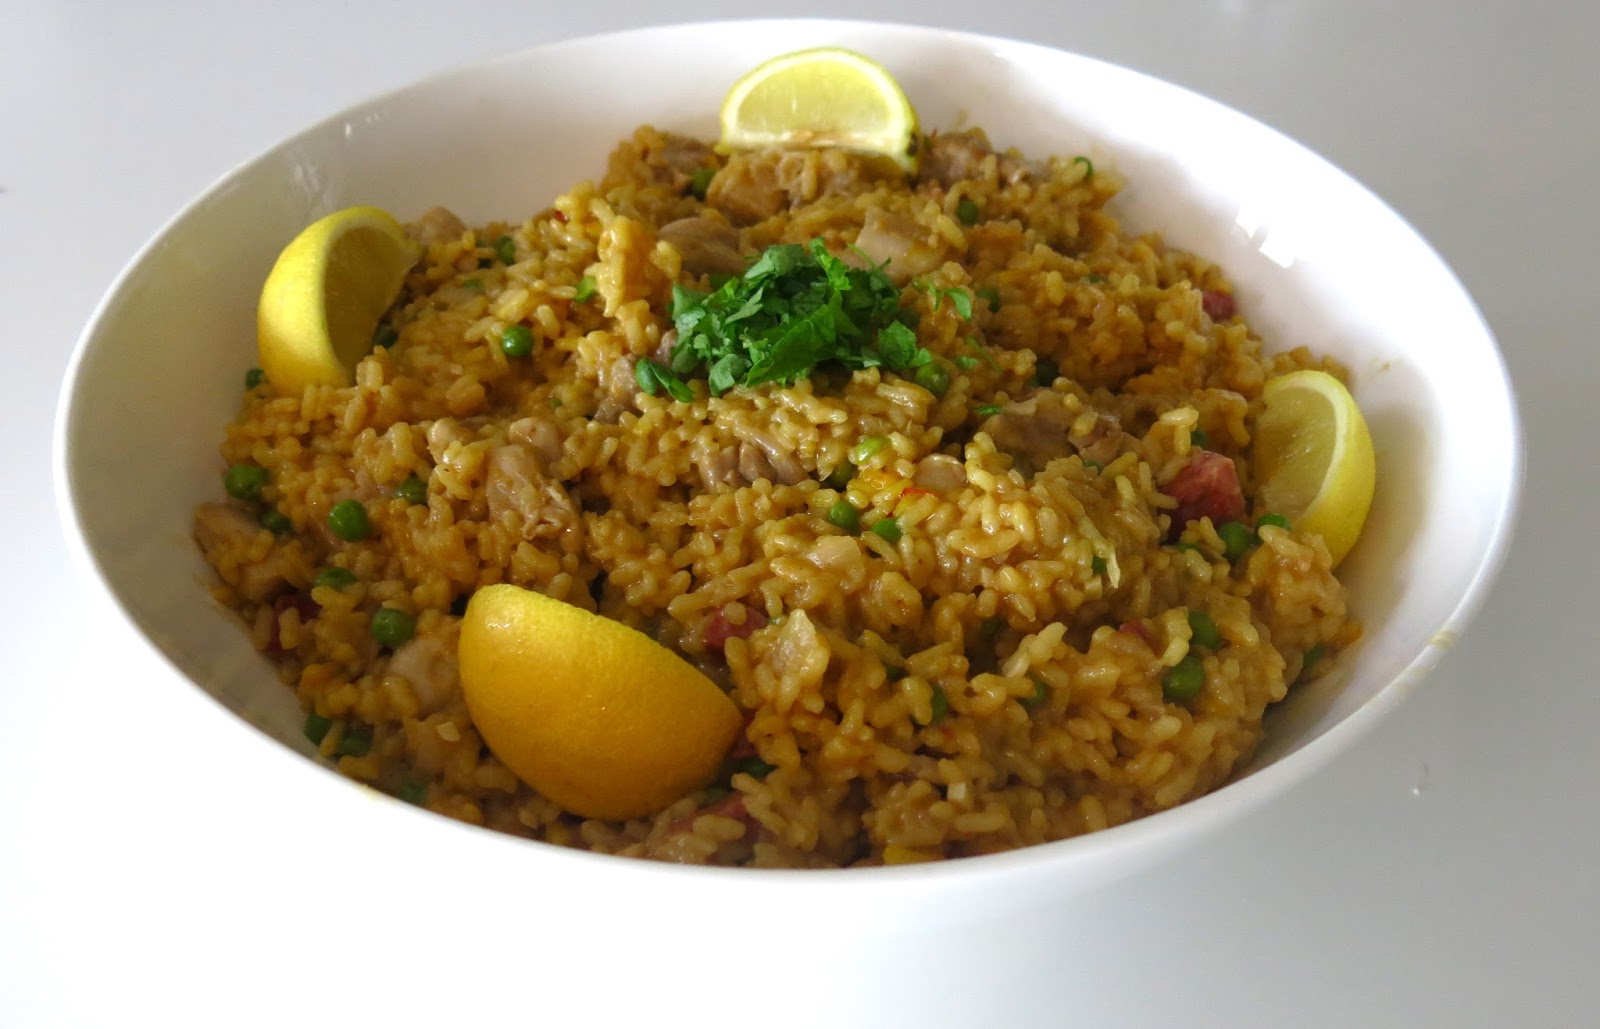
Chicken, Chorizo and Pork Belly Paella

Paella is a Spanish rice dish that I have always loved for the juicy prawns and other exotic seafood you will find in the paella of fancy cookbooks and Spanish restaurants hitting the tourist market. These paellas are delicious but recreating them at home can be expensive after buying an array of different seafood and fish. But digging a little deeper into the history of Valencian paella, I have found that the basis of this original dish was in fact chicken and rabbit, much cheaper meats! I have taken the concepts of this original paella along with the typical flavourings, saffron and paprika, to create my own, good value-for-money, all meat paella.


Ingredients to serve 4-6

100g good quality chorizo finely chopped | 500g Boneless Chicken Thighs each quartered | 4 thin boneless belly slices (approx 500g) chopped into bitesize pieces | 400g Bomba Paella Rice | 2 large pinches saffron | 1 heaped teaspoon smoked paprika | 2 litres chicken stock | 4 cloves garlic finely chopped | 1 chopped onion | 2 large handfuls of frozen peas | Handful chopped parsley | 1 lemon | Olive oil | Salt and pepper |

NB: I wanted to add chorizo for another slice of Spanish flavour and love the texture of the chorizo we sell in the shop, you can see it's made of good pork and has not been over processed!

Heat the oven to 190C | Heat the stock and saffron in a pan | Poach the chicken and belly pork pieces in boiling water for 15 minutes | Drain and leave to one side | Place the belly pork pieces on a baking tray and place in the oven for 10 minutes to crisp up the outside skin | Meanwhile heat a tbsp olive oil in a large, shallow pan | Fry the chorizo, onion and garlic till soft on a medium heat | Add half the infused stock, rice and paprika | Cook for 15 minutes stirring occasionally |


After 15 minutes add the chicken pieces, and gradually add the rest of the stock as the rice absorbs it | After another 10 add the belly pork and frozen peas | Cook for a final 5 minutes or until the dish looks done! | Season, take off the heat, and leave for 5 minutes while you prepare some bread and/or salad as accompaniment | Serve, with a sliced lemon and parsley for garnish, at the table rustic-style allowing everyone to help themselves.


Wednesday, 14 August 2013

Blueberry Sponge

This week's recipe is completely off subject, but due to request, I had to include this delicious blueberry sponge that I have made for the boys in the shop when they are working hard on a Saturday. It is again a recipe taken and adapted from Jamie Oliver's Jamie's Italy, one of my favourite cookbooks that I absolutely love, as much for its pictures and stories of Italian life as for its tasty recipes.


Ingredients 
butter for preparing the cake tin
4 large eggs (all of Andrew's eggs are free range from the local Gate Farm, Suffolk)
270g soft golden caster sugar
180g unsalted butter, melted
115ml extra virgin olive oil
155ml milk
1 teaspoon pure vanilla extract
400g plain flour
1.5 teaspoons of baking powder
a pinch of sea salt
zest of 1 lemon grated
zest of 1 orange grated
one large punnet of fresh blueberries (jamie uses 600g but I have found that 350g is plenty)


Preheat the oven to 175C | Generously butter a 25cm/9.5 inch cake tin, line the base with greaseproof paper, and set aside | Either by hand or in the bowl of an electric mixer fitted with a whisk, beat the eggs and sugar for about 10 minutes until thick and pale yellow | Add the butter, extra virgin olive oil, milk and vanilla seeds, and mix well | Sift in the flour, baking powder and salt | Add the lemon and orange zest and stir with a wooden spoon until thoroughly blended | Set aside for 10 minutes to allow the flour to absorb the liquid.

Stir about a quarter of your blueberries or grapes into the batter, spoon it into your prepared cake tin and smooth out the top with a spatula | Place the cake tin in the centre of your preheated over and bake for 15 minutes, the remove it from the oven and scatter the remaining blueberries over the top | Gently push them down into the cake, then return it to the oven for another 30 to 40 minutes until the top is a deep golden brown and the cake feels quite firm | Put the tin on a rack to cool | After ten minutes run a knife along the sides of the pan and turn out your cake.

Wednesday, 7 August 2013

Deli Favourites- Fun Tips and Ideas

From talking to customers in the shop over the last few weeks, it seems that everyone's appetite is disappearing with the hot weather, and I couldn't agree more. I myself have been snacking and lunching on different cheeses, olives and cold meats from our lovely delicatessen, so I thought this week I would show you how I've been putting them to use to eat more lightly in the hotter weather.


1. Parma Ham and Melon has long been a favourite on Spanish tapas menus and is deliciously refreshing in the hot weather. My mum made these gorgeous little bundles as nibbles for a BBQ we had the other weekend. Simply cut melon into small sections, and add a folded piece of Andrew's Parma Ham, sliced thinly on request, attaching to the melon with a cocktail stick.


2. As well as our excellent Italian Buffalo Di Mozzarella that we sell as a whole ball in a pot, we also sell the same cheese in little individual balls in a pot. This makes it really easy to tear into salads for lunches. Serve here as I did with a plate of tomato spaghetti for a quick yummy lunch on a hot day.


3. I absolutely adore this Finnochiona salami which has to be my favourite of all the salamis that we sell in the shop. Finnochio translates as fennel in Italian, and the small pieces of fennel running through the salami give it a delicate but very unique taste. What I love about the salamis we serve in the shop, apart from their taste, is that we slice on request so customers can have as much or as little as they like and as thick or thin as they like it. A friend made me a lunch of a couple of slices of the Finnochiona salami with a light salad the other day and it was simply delicious!


4. We have now started selling small pitted black olives, thankfully, as it means I no longer have to fiddle about taking the stone out each time I want to cook with them. For easy potatoes with a summer feel, I slice roasting potatoes and add them to a roasting dish with thyme, olive oil and sliced black olives. Roast for 45 mins in a hot oven until golden, stirring occasionally. The olives give the potatoes a delightful flavour even if you want to discard them afterwards. This potato dish is also lovely if you add our Bridge Farm lamb cutlets 10 mins before the end of cooking, as the meat juices enrich the flavour of the potatoes even more. 

Wednesday, 31 July 2013

Monte Enebro Goat's Cheese and Sun Dried Tomato Tart

From the time to time Andrew's like to try new cheeses and offer our customer's something a little different. These last two week's we have started selling a new goat's milk cheese, Monte Enebro, which has been incredibly popular. Perhaps you'll understand how good it is when I tell you that I, who previously avoided all goat's cheese like the plague, am absolutely in love with it. So much so, I made this super easy, but delicious, goat's cheese and sun dried tomato tart. Monte Enebro is an artisanal  Spanish cheese with a unique black rind that is at the same time creamy in texture and complex in flavour. Only 7000 are made a year, so we're extremely lucky to be selling it in our shop!

You will need:
1 sheet of puff pastry, already rolled
100g Andrew's sun dried tomatoes
200g Monte Enebro Cheese
Some olive oil
Black pepper and salt
Thyme leaves, or other herbs.


 1  Preheat your oven to 200C.  2  Dust your pastry sheet with flour and place in a baking tray.  3  Chop sun dried tomatoes and arrange in the middle of the pastry so that there is enough room for the pastry to rise around it at the edges.  4  Slice and chop your Monte Enebro cheese into smaller pieces and arrange on top of the sun dried tomatoes.  5  Drizzle with some olive oil, some fresh herb leaves, and season with salt and pepper.  6  Place in the oven for 15 minutes, cooking until golden brown. Give a few more minutes if necessary.  7  Serve hot and enjoy!


The amount this tart serves is largely dependent on how you want to serve it. As a rectangle, you could slice it into bite size pieces suitable for a party or serve it in four slices, as I have done, to serve four for lunch or a starter.

Wednesday, 24 July 2013

Pork Chops with Sage on Roasted Potatoes with Bacon Pieces

I haven't done a Jamie Oliver recipe for a while so thought I would cook my version of his Italian pork chops from his book, Jamie's Italy. It's one of my favourites to do as everything is cooked in the one roasting dish, apart from browning off the pork chops at the beginning, and the meat juices from our delicious Dingley Dell pork chops give the potatoes the most amazing flavour! We've been using Dingley Dell pork from their Suffolk farm for many years now and are happy to have such a great supplier so close to us! For more information on how they raise their fabulous pork click here.

Ingredients: 
Andrew's Dingley Dell pork chops on the bone
Roasting potatoes peeled and diced
A bunch of sage leaves
2-3 rashers of smoked streaky bacon roughly chopped
2-3 garlic cloves cut in half
Sunflower oil
Salt and pepper 

1  Preheat your oven to 180C. 2  Bring the potatoes to the boil, and par boil for 3-4 minutes. Drain and shake in the saucepan to make your edges fluffy. 3  Meanwhile add 4 good tablespoons of sunflower oil to the roasting dish and heat in the oven for ten minutes. 5  Remove and add your potatoes with the garlic cloves and chopped bacon pieces. 6  Heat up a frying pan with a splash of oil and brown off your seasoned pork chops each side.  7  After your potatoes have been cooking for about 15 minutes, place the pork chops and sage leaves on top.


8. This lets the potatoes cook in the meat juices, yet it will also make them quite soft. So if you want them a little crispier, after another 15 minutes take out the roasting dish and move everything around so that the potatoes are on top. 9  The dish should take a further 15 minutes to finish. Serve with veg and gravy as desired. 

Tuesday, 16 July 2013

Lamb Schawarma

I enjoyed last week's beautiful weather on a course in Shepherd's Bush, a multicultural area of London with lots of middle eastern and Mediterranean cafés. With holidays and hot weather in mind, I decided to cook this delicious middle eastern dish that a friend suggested to me, using Andrew's extremely local Bridge Farm Lamb. The name Schawarma simply refers to meat that has been marinaded in spices, grilled, then sliced to be served as a kebab in a pitta. It tastes delicious and is perfect cooked on a traditional Weber barbecue that gives the meat a unique, slightly smokey flavour. Most recipes use leg of lamb but I chose shoulder, as it is less money per kilo than the leg, and because of the marbling has slightly more flavour. The whole shoulder you see below was later boned out (which the butchers will be happy to do for you!) so that it laid flat on the BBQ and was easier to carve.


Ingredients: 
1 Whole Boned Lamb Shoulder (Serves 4-6) 
2 Garlic Cloves Crushed 
100 ml Olive Oil  
Handful of Fresh Coriander Finely Chopped 
Tsp Ground Paprika 
Tsp Ground Cumin
Tsp Ground Allspice
Tsp Dried Oregano 
Juice and Zest of One Lemon 
Salt and Pepper 

NB: I kept my spice mix quite simple, but you could add some ground ginger, ground cinnamon, cayenne pepper or turmeric as you wish, to enrich the flavour. The key to this dish is also in the amount of time you leave the meat to marinate. Overnight is optimum although the morning before you eat is ok too. 


To make the marinade simply add the coriander and garlic to the lemon juice and olive oil in a bowl and mix until the garlic starts to turn the mixture slightly cloudy. Then add your spices and seasoning and mix. On the skin side of the lamb make some incisions all over with a sharp knife. Pour over your boned out lamb shoulder and massage the marinade into the meat making sure it is thoroughly covered. Leave in a covered bowl in the fridge until you are ready to cook. 


Once your barbecue is hot, place the lamb on the grill leaving the lid on to keep the heat in (but with the vents open). Boned out, the lamb should take 45 minutes, and should be turned over mid way through. You could of course cook this in the oven but it tastes so much better on the barbecue!!! Serve with lettuce, tzatsiki and warmed pittas to remain traditional or any other accompaniments that you would prefer. For example, my dad has to have a gluten-free diet so I also made up a lovely rice dish with red pepper, red onion, sweetcorn and herbs for him to have instead of the pitta breads. If there are only four of you, the lamb is also amazing cold the next day, I am eating some now as I write this! 


Monday, 8 July 2013

Barbecue Economy

When the sun starts to shine, as we have been blessed with this week, us Brits tend to go a bit mad with our money, with all sensible saving going out the window. This can often be the case when barbecuing: as we do it so little it can be hard to figure amounts and costs per person, but with a little BBQ know how, it doesn't have to be expensive. This weekend we had our neighbours and family round to enjoy the sunshine and to enjoy some good barbecue meats! Keeping things simple we kept away from the marinated steaks that are delicious for small numbers of people and instead turned to whole joints of meat, that we marinated for the barbecue.


For example, last week my brother and I showed you how easy it is to cook a spatchcocked chicken: as it is laid out flat it cooks much more evenly. It is also much more economical than individual portions. The same can be said for a shoulder or leg of lamb which the boys in the shop will happily debone and open out so that it cooks through evenly and quickly. Whats more, if the sun does decide to hide away, which is more than likely, these joints can always be easily roasted.

As marinades and flavours go we sell some delicious barbecue and oriental flavoured sauces from Cottage Delight which keep the meat succulent and are ridiculously easy to apply to the meat and leave. For the lamb however I often mix olive oil, lemon juice, crushed garlic cloves and whichever herbs happen to be in the garden and massage into the meat.

My final money saving tip for the barbecue is Andrew's chicken wings in barbecue sauce, which my brother, cousins and I have practically grown up on and without them, would not consider a barbecue to be a decent barbecue! They are currently £3.20 per kilo and you really do get a lot for a kilo so they are great if you want to supplement a more expensive meat or if you are feeding a big party of children. I am 21 and still adore them, I could eat a plate of them by myself so they are definitely a winner!